10 Foil Nails Designs to Try Right Now — From Subtle Shimmer to Full Glam
Your nails are one of the fastest ways to signal that you know what’s happening in fashion right now — and foil nails designs have become the shortcut to looking like you just walked out of a high-end salon. Whether you want something barely-there and glowy or a full mirror-finish statement manicure, there’s a foil nail look that fits your vibe.
The problem most people run into. Too many options, not enough guidance. This guide breaks down 10 of the most wearable, on-trend foil nails designs you can try right now — complete with application tips, the best color combos, and styling notes for every occasion.
1. Classic Gold Leaf Foil Nails

Gold leaf foil is where most people start — and for good reason. It’s one of the most timeless foil nails designs in the beauty world, landing somewhere between editorial chic and everyday wearable. The appeal is in its imperfection: jagged, organic-looking pieces of gold foil applied over a nude or sheer base create the illusion of gilded skin.
How to get this look: Apply your base color and let it cure. While the top coat is still tacky, press small torn pieces of gold nail foil transfer paper onto each nail using a silicone tool or your finger. Seal with a gel top coat for longevity. Almond and coffin shapes work best because they give the foil room to breathe visually.
This design pairs effortlessly with neutral outfits and works from a daytime meeting straight through to a dinner out.
2. Holographic Rainbow Foil
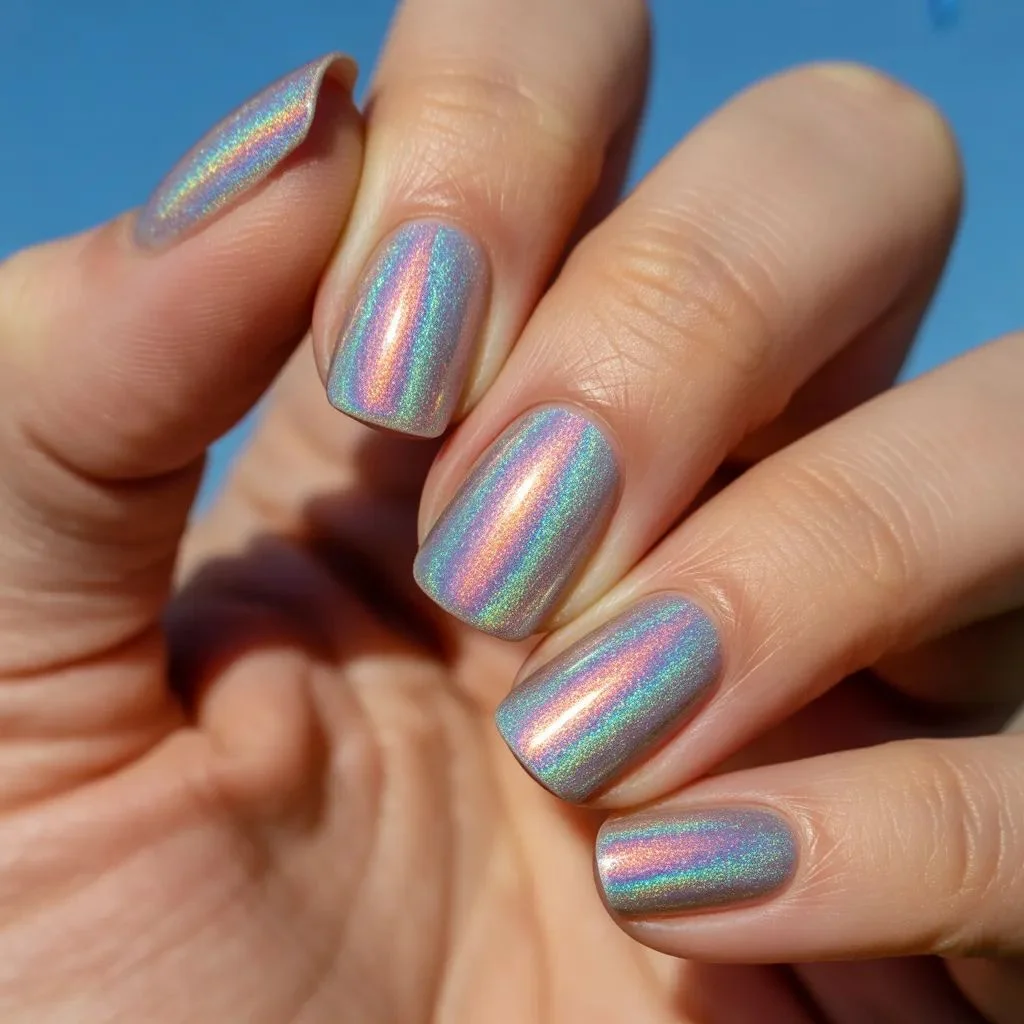
If there’s one foil nails design that stops the scroll, it’s holographic. Full-coverage holographic foil picks up every light source in the room and transforms it into a prismatic rainbow — and it genuinely photographs like nothing else. This is the one people stare at.
How to get this look: Apply a white or light silver gel base to maximize the holographic effect (dark bases mute it). Press the holographic nail foil transfer directly onto the tacky top coat, rub firmly, then peel. The color shift you see depends on the angle of light — some foils lean pink-to-blue, others span the full spectrum. Finish with a non-wipe matte or glossy top coat. Square and squoval shapes show off the full rainbow effect best.
Wear this one for festival season, special events, or any day you want your hands doing the talking.
3. Rose Gold Chrome Foil
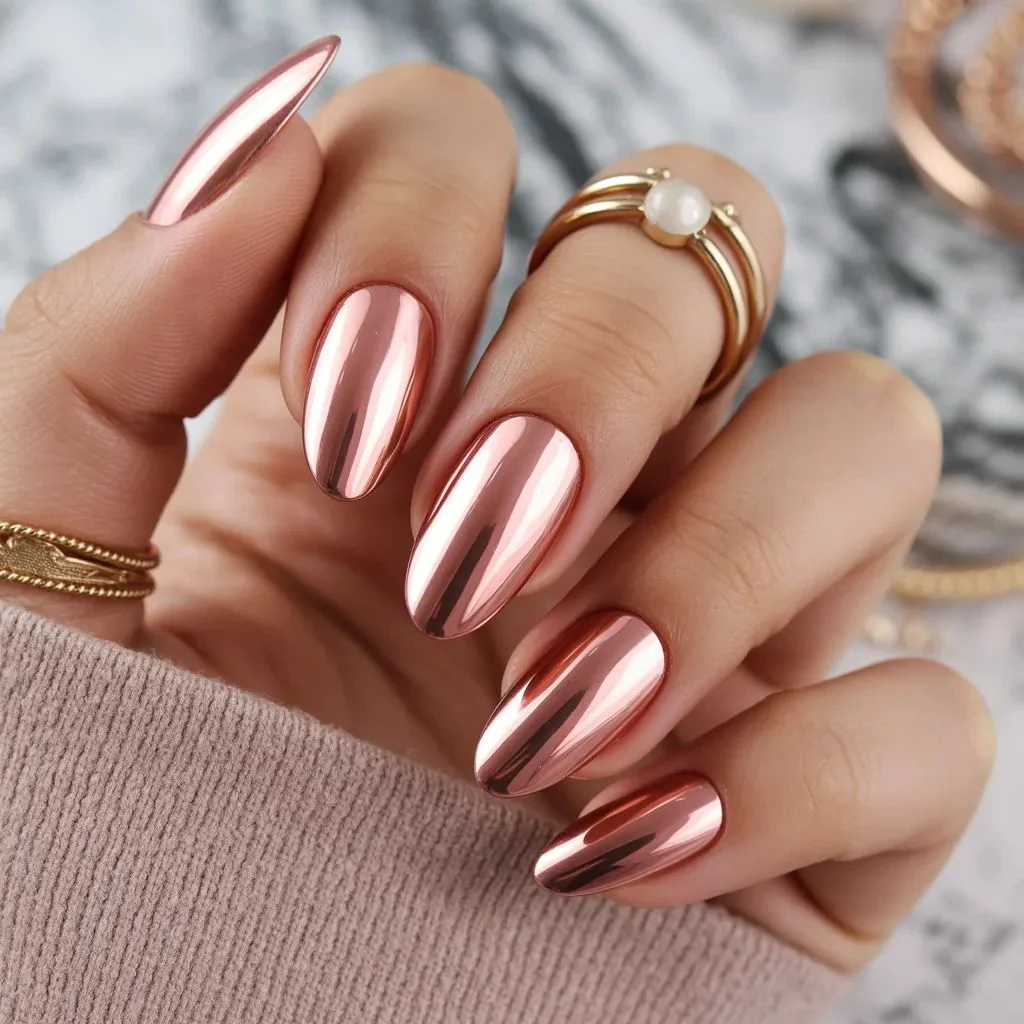
Rose gold has staying power for a reason — it’s warm, romantic, and flatters virtually every skin tone. As one of the most popular foil nails designs right now, the rose gold chrome look gives you a full mirror-finish in that distinctive peachy-metallic tone that reads as luxe without being flashy.
How to get this look: Apply a gel builder in a blush pink or nude base. Top with a sticky layer (no-wipe gel works perfectly here), then press rose gold chrome powder using a sponge applicator or silicone brush. Alternatively, use rose gold nail foil transfer strips for a quicker result. Seal with a top coat to lock in the chrome. Oval and almond shapes make this look especially elegant.
This is the go-to for bridal manicures, date nights, and anything that calls for a polished, feminine finish.
4. Foil French Tips
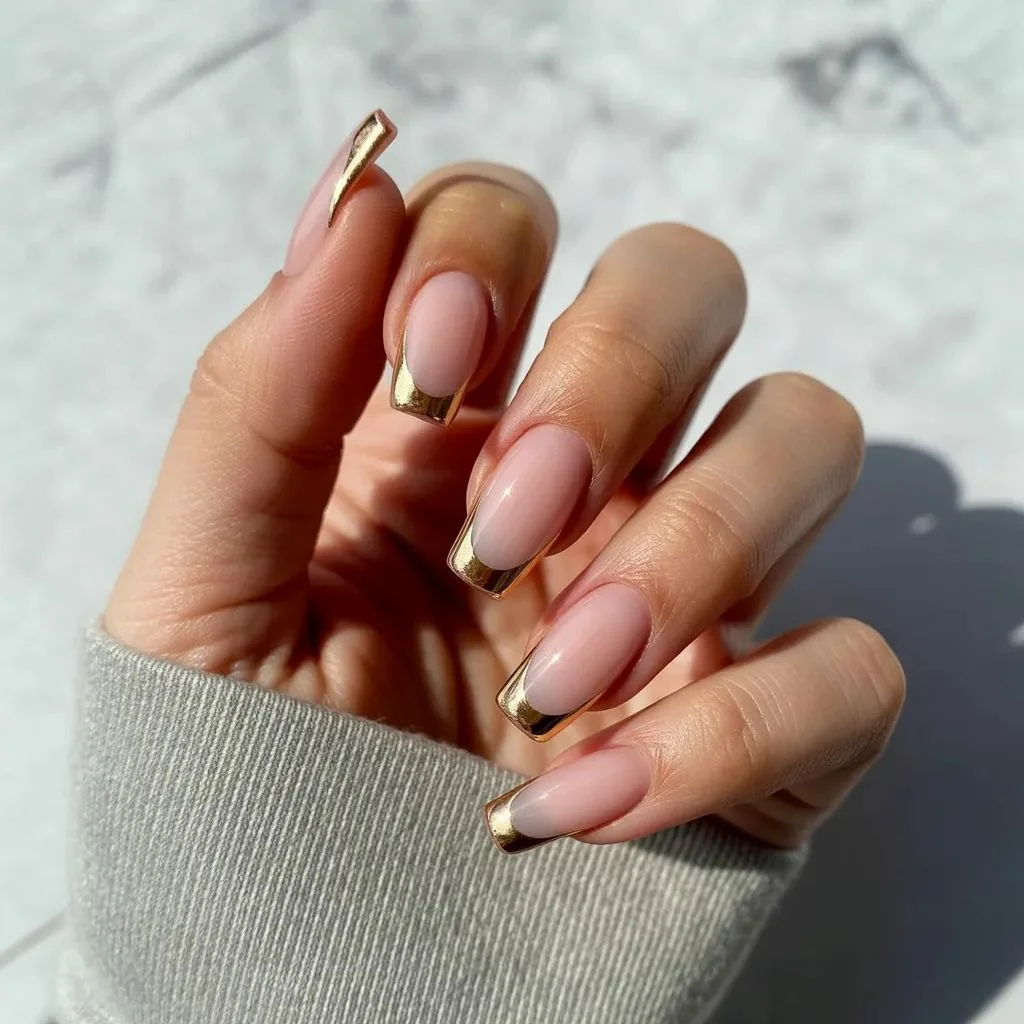
The French manicure never actually goes away — it just keeps reinventing itself. In 2025, the update worth trying is the foil French tip: instead of painted white ends, you get a thin line of metallic or holographic nail foil that adds serious edge to a traditionally quiet look.
How to get this look: Paint your base color as usual and let it fully cure. Apply a thin strip of sticky top coat only to the tip area. Press a gold, silver, or holographic foil strip across the tip, rub firmly, then peel slowly to reveal a crisp metallic line. Use a clean brush dipped in acetone to sharpen any rough edges. Coffin and stiletto shapes give the foil tip the most dramatic reveal.
This design is the perfect answer for anyone who wants a “special occasion” manicure that still feels office-appropriate.
5. Tortoiseshell + Gold Foil Accent
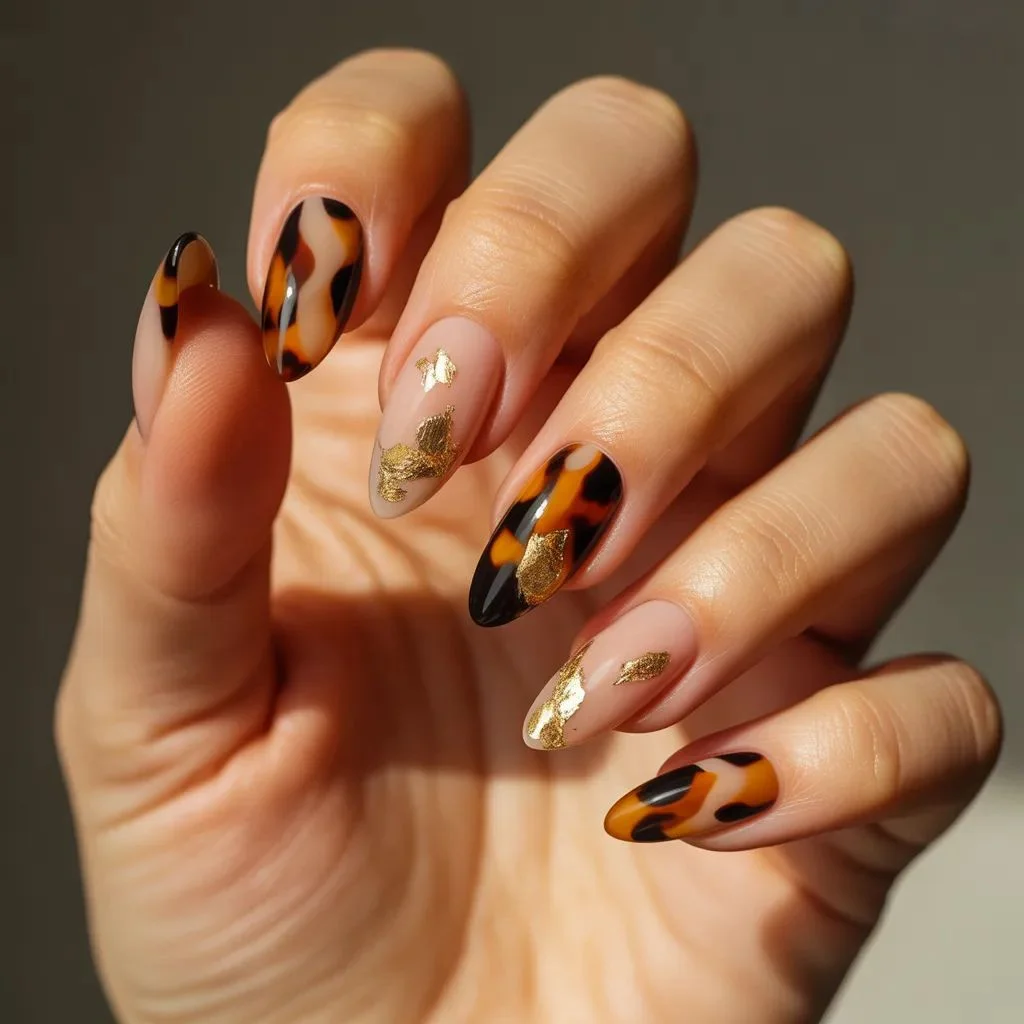
Tortoiseshell nails have been having a serious moment, and pairing them with gold foil turns an already elevated design into something truly editorial. The warmth of caramel, amber, and black layered with irregular gold foil pieces is one of the most sophisticated foil nail designs you can wear — and it works across seasons.
How to get this look: Start with a clear or amber gel base. Use a small detail brush to dab on caramel, brown, and black gel polish in an organic, overlapping pattern. While the design is still wet, press small pieces of gold foil transfer onto two or three accent points per nail. Cure and seal. Almond and oval shapes carry the organic tortoiseshell print beautifully.
This is the grown-up version of a statement nail — rich, textured, and impossible to replicate with a simple polish.
6. Pastel Base with Iridescent Foil
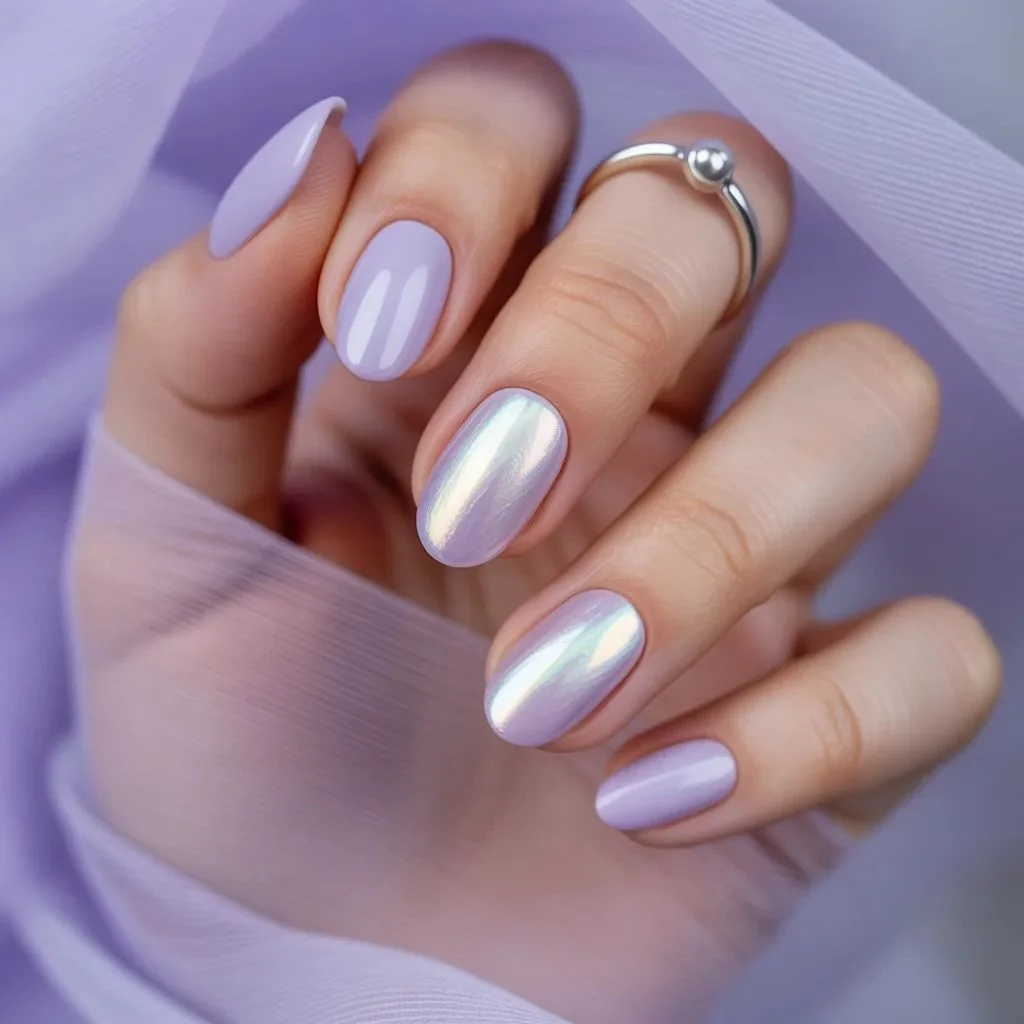
Soft pastels and iridescent foil are a combination that feels both delicate and eye-catching — the kind of foil nails design that looks completely different depending on the light. A lavender, mint, or baby blue base topped with pearl or aurora foil creates a mermaid core effect that’s trending hard right now.
How to get this look: Choose your pastel gel base and cure fully. Apply a thin, tacky gel layer. Press iridescent or pearl nail foil transfer strips — these typically shift between white, pink, and blue. Because the base is light, the foil effect will be especially vibrant. Seal with a glossy top coat to deepen the shimmer. Oval and short almond shapes work best for this dreamy aesthetic.
Think of this as your spring and summer go-to, or whenever you want something feminine without feeling predictable.
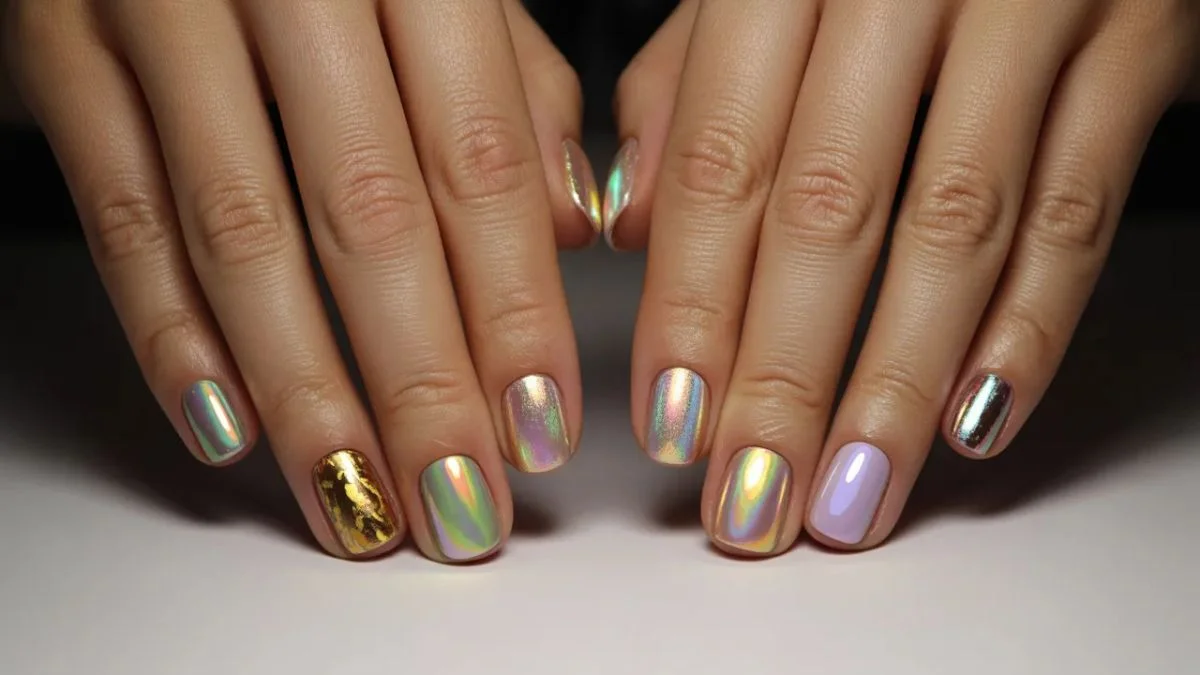
7. Full-Coverage Mirror Foil
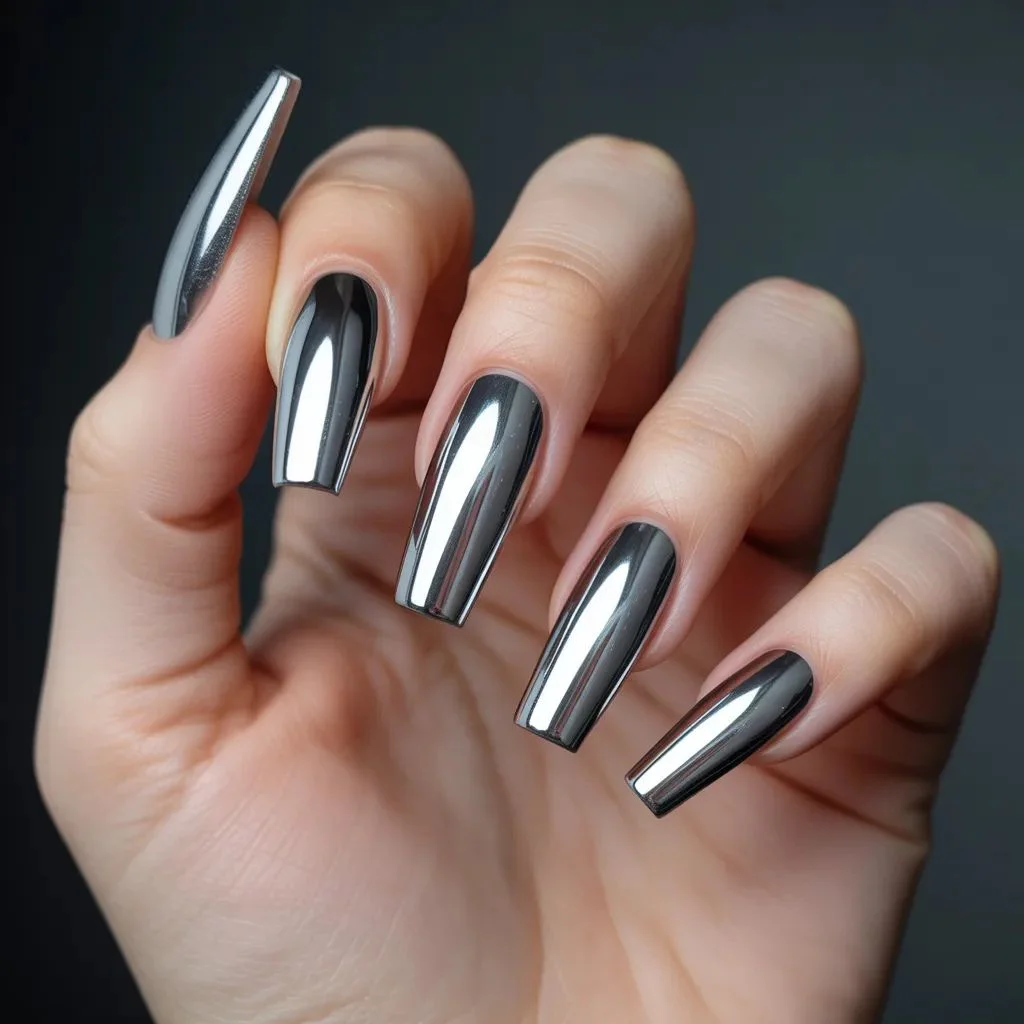
This is the foil nails design that makes people ask “are those real?” Full-coverage mirror foil — particularly in chrome silver — creates a finish so reflective it literally shows your face. It’s futuristic, bold, and genuinely one of the most attention-commanding manicures you can wear.
How to get this look: Apply a black or white gel base depending on whether you want a warm or cool-toned mirror effect (black intensifies the chrome, white brightens it). Cure, then apply a sticky layer. Press silver mirror foil transfer across the entire nail surface, rubbing firmly with a silicone tool. Peel slowly at a 45-degree angle for the cleanest lift. Seal with a non-wipe gel top coat. Coffin and stiletto shapes maximize the mirror effect.
Save this one for events where you actually want your nails to be the centerpiece of the look.
8. Foil Ombre Nails
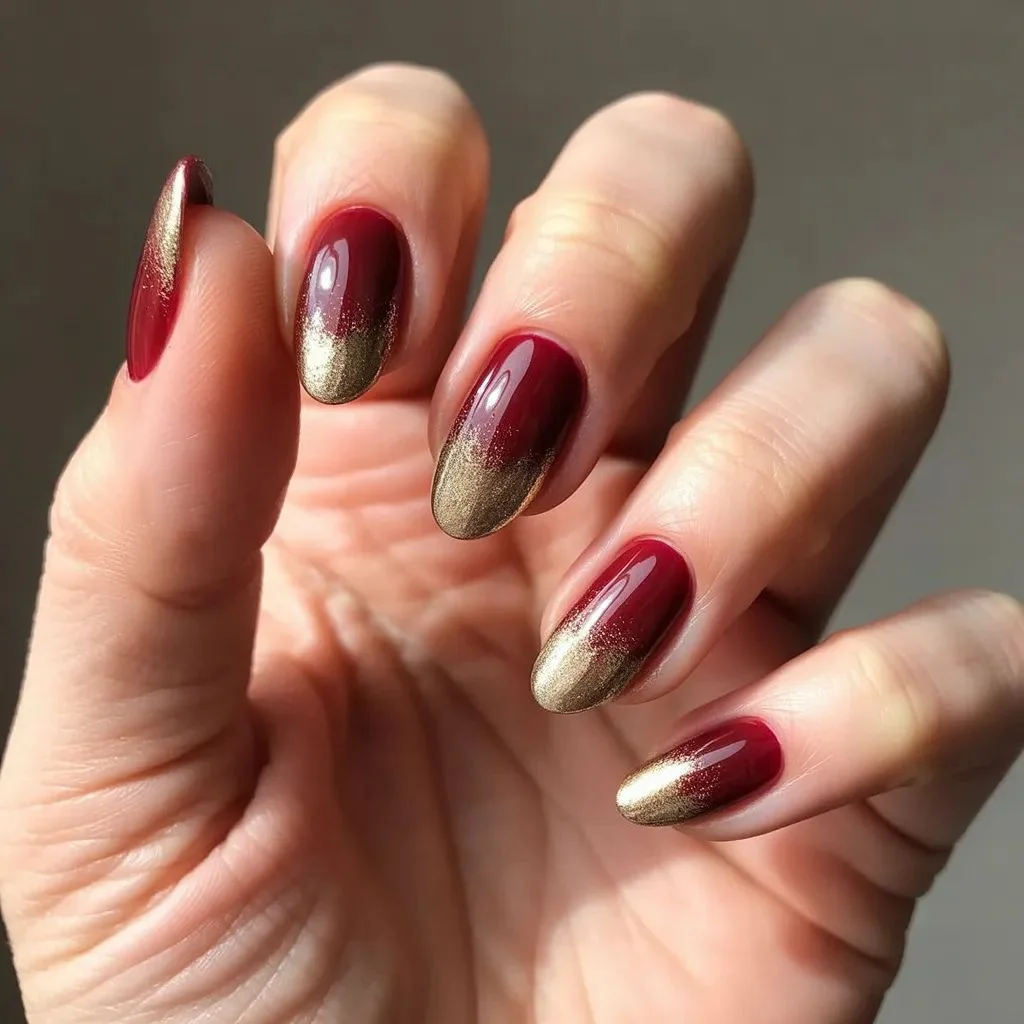
Ombre nails are a perennial favorite, but adding foil to the transition zone takes the look from predictable to genuinely striking. Foil nails designs with an ombre effect work by concentrating the metallic foil at the tips or the center of the nail, creating a gradient that shifts from color into shine.
How to get this look: Apply your base color — deep jewel tones like burgundy, forest green, or navy create the most dramatic contrast. Use a sponge to blend a lighter or metallic gel into the tip area while still tacky. Apply foil to the tacky section, rub and peel. The foil adheres only where the gel is sticky, naturally creating the ombre gradient. Seal and finish. Almond and coffin shapes handle the gradient transition best.
This look is especially powerful in fall and winter — rich, moody base tones with a touch of metallic glamour.
9. Abstract Aurora Foil
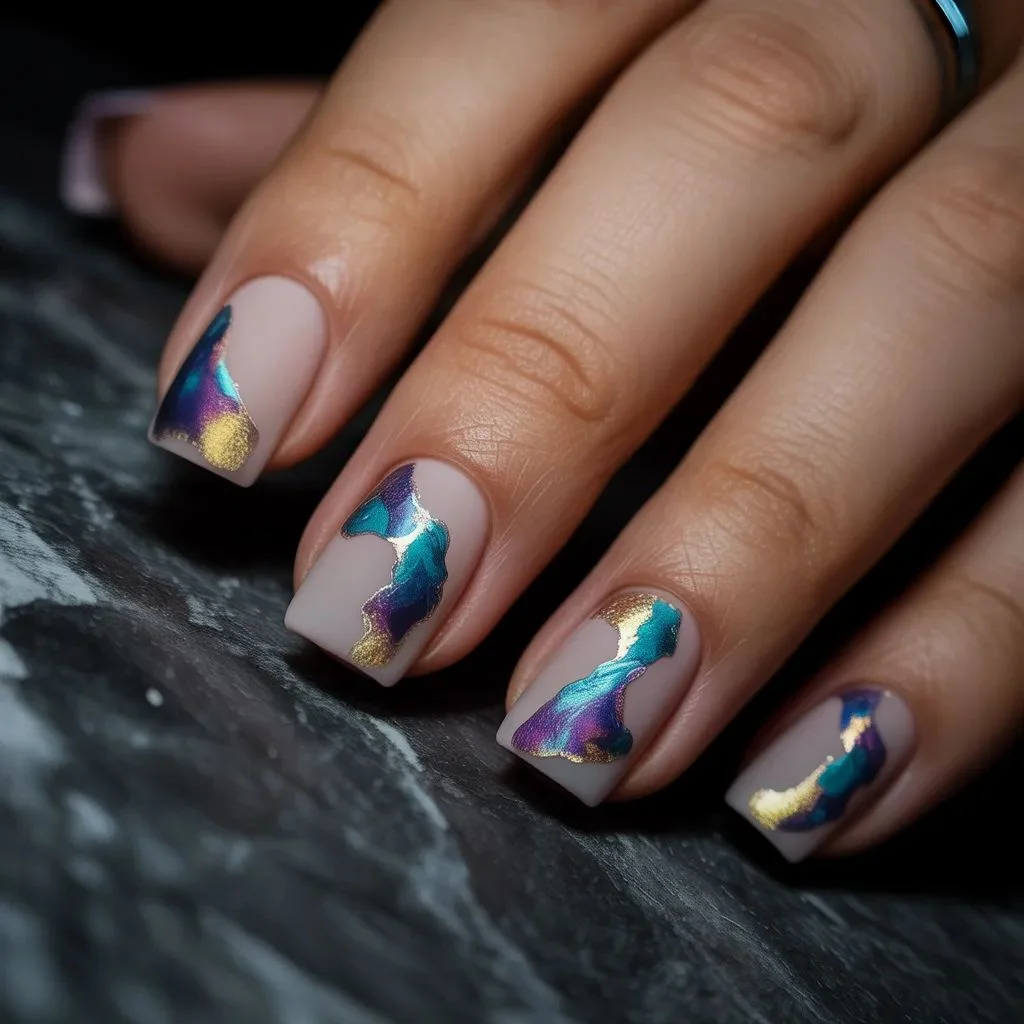
Aurora-inspired nail art has been one of the defining trends of the past year — and when you incorporate foil into the design, the result is something that looks almost three-dimensional. Abstract aurora foil nails use irregular patches of iridescent or colored foil on a matte base to mimic the shifting light of the northern lights.
How to get this look: Apply a matte nude or translucent gel base. While still tacky, press torn pieces of aurora or colored nail foil — mixing teal, purple, and gold — in an abstract, non-uniform pattern across the nail. Leave some of the base visible for contrast. The matte-versus-metallic interplay is what makes this design so visually complex. Cure and seal with a matte top coat over the base, and a glossy coat only over the foil sections for a mixed-finish effect. Square and coffin shapes give the abstract design structure.
This is a conversation-starter design — artistic, unexpected, and completely your own.
10. Minimalist Single-Nail Foil Accent
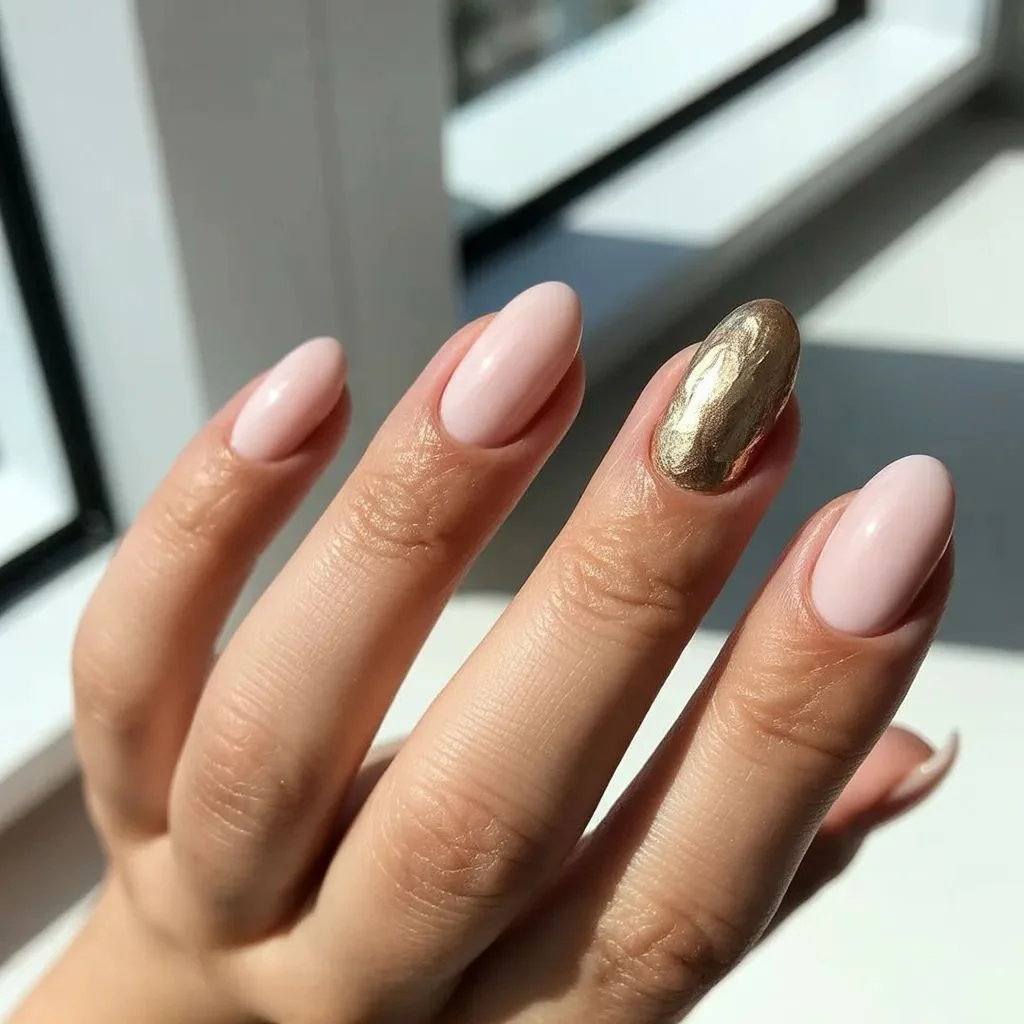
Not every foil nails design needs to go all-in. The single accent nail remains one of the smartest approaches in nail art — understated until you move your hands, then undeniably striking. A single finger in full foil against four polished, matching nails is the minimalist’s version of a statement manicure.
How to get this look: Paint all nails in your base color. On your ring finger (the traditional accent nail) or your middle finger for a bolder choice, apply a full-coverage foil in gold, silver, or holographic. Keep everything else simple and polished. This is the easiest way to experiment with nail foil transfer techniques without committing to a full set. Oval and almond shapes balance the subtle drama perfectly.
If you’re new to foil nails or just want a polished everyday look with a hint of something extra, this is where to start.
Tips for Making Your Foil Nails Last
Foil nails designs look stunning when they’re fresh — and with the right prep and finish, you can keep them looking that way for two weeks or more. A few things make the biggest difference:
• Prep is everything. Push back cuticles and lightly buff the nail surface before applying any base coat. Foil adheres best to a smooth, oil-free nail.
• Use a tacky layer — not a cured layer. Foil bonds to sticky gel. Apply your transfer when the top coat is still tacky (not fully cured). If using regular polish, apply foil over a slightly wet topcoat.
• Apply at a 45-degree angle. Peel the foil sheet back at a steep angle rather than straight up — you’ll get a cleaner, more precise lift.
• Seal with a gel top coat. A standard air-dry top coat won’t lock in foil as effectively. A UV-cured gel top coat creates a protective dome that keeps the foil from lifting at the edges.
• Avoid oil-based products on the nail. Cuticle oil is fine around the nail but applying it directly on top of foil can cause early peeling.
The Only Manicure Trend Worth the Investment
Foil nails aren’t a passing trend — they’re a technique that’s evolved across years of nail art innovation, and in 2025 they’re more wearable and accessible than ever. From the restraint of a single gold accent nail to the maximalist drama of a full holographic mirror set, foil nails designs offer a range that few other nail techniques can match.
The best part? You don’t need a salon to pull them off. With the right foil transfer sheets, a steady hand, and a gel top coat, these designs are doable at home. Start with design #10 if you’re a beginner or go straight to #7 if you’re ready to make a statement. Either way — your next manicure just got a serious upgrade.
Highly Recommended: 10 Grey Nails Ideas Trending Right Now — From Soft Dove to Deep Charcoal.